반응형
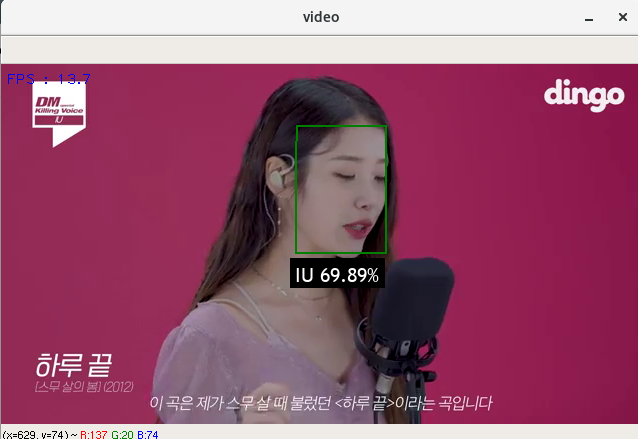
영상을 인식시켜보자.
face_recognition 폴더 경로에서 아래 코드 입력 ㄲ
python -m inference.video_classifier --video-path ./data/test_img/IU/<영상이름>.mp4 --save-dir ./data/output_img/<저장영상이름>.mp4
#예시: python -m inference.video_classifier --video-path ./data/test_img/IU/videoplayback.mp4 --save-dir ./data/output_img/videoplayback_output.mp4
오리지널 리포에서 내가 원하는대로 좀 수정했다.
./data/output_img 폴더에 가보면 인식된 결과 영상이 저장되어있을 것이다.
중간에 영상 끄고싶으면 'q' 버튼을 누르면 된다.
def main():
    args = parse_args()
    # cap = cv2.VideoCapture(0) #webcam

    cap = cv2.VideoCapture(args.video_path)
    face_recogniser = joblib.load(MODEL_PATH)
    preprocess = preprocessing.ExifOrientationNormalize()
    prevTime = 0
    save_dir = args.save_dir

    width = int(cap.get(cv2.CAP_PROP_FRAME_WIDTH))
    height = int(cap.get(cv2.CAP_PROP_FRAME_HEIGHT))
    writer = cv2.VideoWriter(save_dir, cv2.VideoWriter_fourcc(*'mp4v'),25, (width, height))


    while True:
        # Capture frame-by-frame
        ret, frame = cap.read()
        curTime = time.time()
        sec = curTime - prevTime
        prevTime = curTime
        fps = 1 / (sec)

        #Remark FPS in video
        str = "FPS : %0.1f" % fps
        cv2.putText(frame, str, (5, 20), cv2.FONT_HERSHEY_PLAIN, 1, (255, 0, 0))

        #img to array
        img = Image.fromarray(frame)
        faces = face_recogniser(preprocess(img))
        if faces is not None:
            draw_bb_on_img(faces, img)

        # Display the resulting frame
        cv2.imshow('video', np.array(img))
        # Save the video
        writer.write(np.array(img))

        # Quit button('q')
        if cv2.waitKey(1) & 0xFF == ord('q'):
            break

    # When everything done, release the capture
    cap.release()
    writer.release()
    cv2.destroyAllWindows()

반응형
'VAS > Centos 7 개발환경 구축' 카테고리의 다른 글
| YoloV4 CentOS7 개발환경 설치 정보 정리 메뉴얼 (1) | 2021.11.04 |
|---|---|
| CentOS 7 Linux Unable to access "SSD" 외장하드 연결 문제 해결 (0) | 2021.11.03 |
| Face Recognition 제작기 -2단계 이미지 추론결과 다루기 (0) | 2021.10.13 |
| Face Recognition Custom 제작기-1단계 학습시키기 (0) | 2021.10.13 |
| SQL 기초 - SELECT, DISTINCT, WHERE (0) | 2021.10.06 |


댓글