목차
EP1. 데이터셋 만들기
EP2. 모델 훈련시키기
EP3. 정확도 확인하기
EP4. 예측하기
2. 모델 훈련시키기
구글드라이브 - 새폴더 생성(ex. detectron2)

마우스우클릭 - 더보기 - Google Colaboratory 클릭

런타임(화면상단) - 런타임유형변경 - None->GPU로 변경
왼쪽 폴더 - 드라이브마운트(중앙폴더) - Google Drive에 연결 클릭

폴더를 하나씩 눌러보면 drive/My Drive/Coding/detectron2 폴더가 보인다.

설치시작!
폴더 우클릭 - 경로복사 - 코드 첫 줄에 %cd /content/drive/My Drive/Coding/detectron2 입력
%cd /content/drive/My Drive/Coding/detectron2

torchvision 설치
# torchvision 설치
!pip install -U torch torchvision
!pip install git+https://github.com/facebookresearch/fvcore.git
import torch, torchvision
torch.__version__
detectron 오리지널 github clone (%cd 경로는 본인 경로에 맞게 수정해야합니다.)
# detectron2 original repo clone
%cd /content/drive/My Drive/Coding/detectron2
!git clone https://github.com/facebookresearch/detectron2 detectron2_repo
!pip install -e detectron2_repo
상단(런타임) - 런타임 다시시작 클릭

라이브러리 import
# You may need to restart your runtime prior to this, to let your installation take effect
# Some basic setup
# Setup detectron2 logger
import detectron2
from detectron2.utils.logger import setup_logger
setup_logger()

# import some common libraries
import matplotlib.pyplot as plt
import numpy as np
import cv2
from google.colab.patches import cv2_imshow

# import some common detectron2 utilities
from detectron2.engine import DefaultPredictor
from detectron2.config import get_cfg
from detectron2.utils.visualizer import Visualizer
from detectron2.data import MetadataCatalog, DatasetCatalog
내가 만든 데이터셋 폴더 생성 - data/images , images안에는 사진 넣고 data폴더에는 trainval.json 라벨 업로드.
(업로드방법은 로컬폴더에서 그냥 드래그해서 폴더에 넣으면 업로드됨)
# data folder make
%cd /content/drive/My Drive/Coding/detectron2
!mkdir data
%cd data
!mkdir images
%cd ..
!pwd 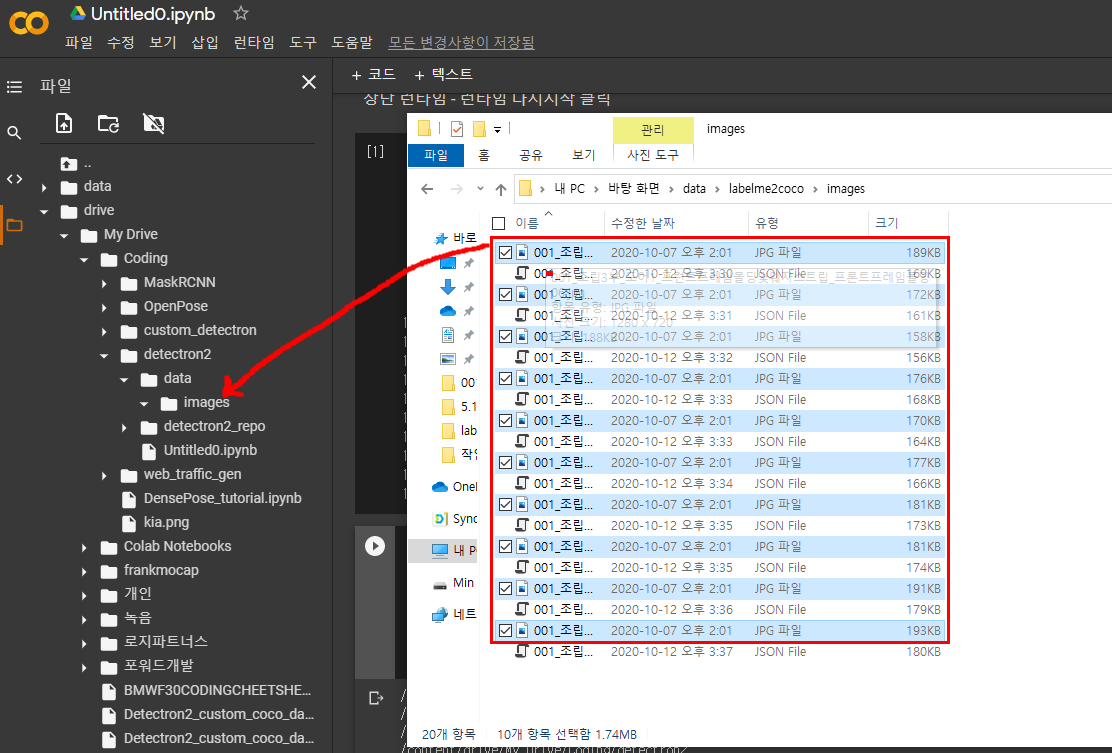


person 객체를 추가
# coco 데이터셋에 person 객체instance를 추가해준다.
from detectron2.data.datasets import register_coco_instances
register_coco_instances("person", {}, "./data/trainval.json", "./data/images")
person_metadata = MetadataCatalog.get("person")
dataset_dicts = DatasetCatalog.get("person")레이블 데이터 체크
import random

for d in random.sample(dataset_dicts, 3):

    img = cv2.imread(d["file_name"])
    visualizer = Visualizer(img[:, :, ::-1], metadata=person_metadata, scale=0.5)
    vis = visualizer.draw_dataset_dict(d)
    cv2_imshow(vis.get_image()[:, :, ::-1])
Training 시작 - 완료되면 detectron2/output 폴더에 모델가중치가 저장된다.
from detectron2.engine import DefaultTrainer
from detectron2.config import get_cfg
import os

cfg = get_cfg()
cfg.merge_from_file("./detectron2_repo/configs/COCO-InstanceSegmentation/mask_rcnn_R_50_FPN_3x.yaml")
cfg.DATASETS.TRAIN = ("person",)
cfg.DATASETS.TEST = ()   # no metrics implemented for this dataset
cfg.DATALOADER.NUM_WORKERS = 2
cfg.MODEL.WEIGHTS = "detectron2://COCO-InstanceSegmentation/mask_rcnn_R_50_FPN_3x/137849600/model_final_f10217.pkl"  # initialize from model zoo
cfg.SOLVER.IMS_PER_BATCH = 2
cfg.SOLVER.BASE_LR = 0.02
cfg.SOLVER.MAX_ITER = 300    # 300 iterations seems good enough, but you can certainly train longer
cfg.MODEL.ROI_HEADS.BATCH_SIZE_PER_IMAGE = 128   # faster, and good enough for this toy dataset
cfg.MODEL.ROI_HEADS.NUM_CLASSES = 1  # 1 classes (person)

os.makedirs(cfg.OUTPUT_DIR, exist_ok=True)
trainer = DefaultTrainer(cfg)
trainer.resume_or_load(resume=False)
trainer.train()
EP1 : 데이터셋 만들기가 궁금하시다면 hansonminlearning.tistory.com/52
Custom Detectron2 Training!! (Person Detection)-챕터 1 데이터셋 만들기
목차 1. 데이터셋 만들기 2. 훈련시키기 3. 정확도 확인하기 4. 예측하기 1. 데이터셋 만들기 라벨링툴 다운로드 : Labelme << click 새폴더(ex. 바탕화면/data) 만들기 라벨링할 이미지 넣기 라벨링툴 �
hansonminlearning.tistory.com
EP3 : 모델 테스트하기 궁금하시다면 (제작중)
'Coding Project' 카테고리의 다른 글
| 해시-완주하지 못한 선수 (0) | 2020.12.28 |
|---|---|
| Custom Detectron2 Inference!! (Person Detection)-챕터 3 학습된모델로 새로운 이미지 예측하기(구글 Colab) (6) | 2020.10.14 |
| Custom Detectron2 Training!! (Person Detection)-챕터 1 데이터셋 만들기 (7) | 2020.10.12 |
| Selenium으로 웹페이지 자동화하기(feat.***CC 예약) (11) | 2020.08.29 |
| MaskRCNN Custom Training 드디어 종결!! 아.. 고생많았다.(Colab 사용) (17) | 2020.03.28 |


댓글